


![Nikon Custom Settings for Underwater Photography // Ikelite 200DL Housing [VIDEO]](http://www.ikelite.com/cdn/shop/articles/Nikon_Z6_III_Custom_Settings_for_Underwater.jpg?v=1723811955&width=1500)
Featuring John Brigham
Most of us would never think that a few discrete camera settings can make a world of difference in how a camera feels and operates inside of an underwater housing. John walks through four ESSENTIAL camera settings that are easy to overlook yet make a big impact on usability.
I just got done shooting the Nikon Z6 III in the Ikelite 200DL Underwater Housing in Grand Cayman. Due to our shortened timeline I didn't get a chance to really go into the menu system and fully customize it like I normally would, but I did take the time to change a few key settings to make it work better for an underwater application overall making the process more enjoyable.
These few little tricks can improve your odds of success drastically. So, let me show you exactly what I did so that you can change your camera potentially the same way.
Use the Shutter to Start/Stop Video Recording
When I'm shooting video I want to start and stop recording using the shutter button. The reason for that is when you're shooting the camera in your hands, it's very different than when you have it in the housing. The lever that comes out from the side that you take photos with is also just as convenient to start and stop your video. To do that, let's dive into the camera's menu system.
Go to the Pencil Custom Settings Menu and scroll down until you get to G (Video) and then G2 (Custom Controls). On the right-hand column, scroll down until you get to the Shutter Button. Click OK, then you can select Record Videos.
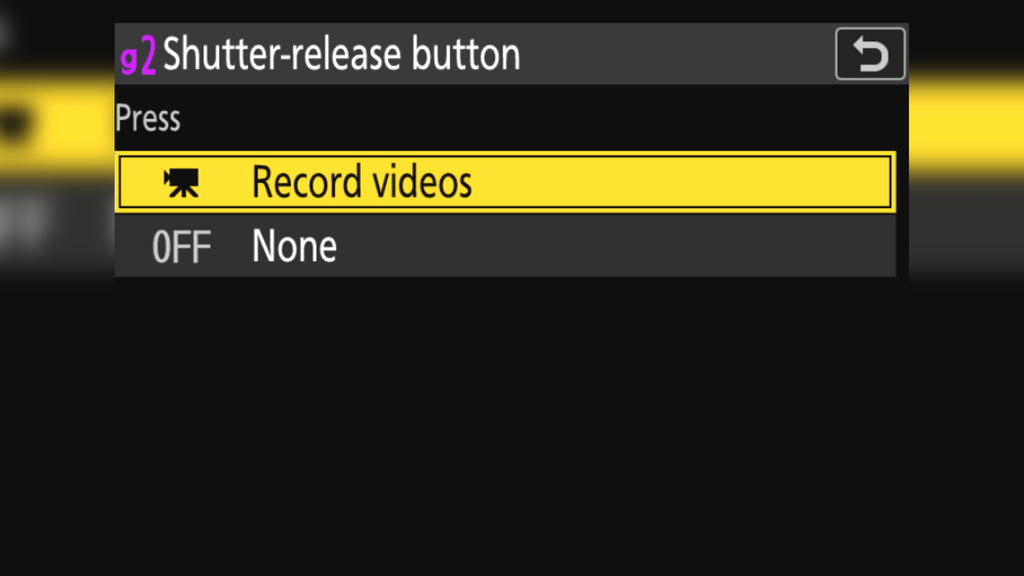
G2 (shutter-release button) menu will allow you to stop and start recording video with the shutter button.
Rotate Dials Without Holding the Button
The next thing, which is a little bit more specific to Nikon, is the Release Button to Use Dial. Typically you hold down the button that you want to change and then you use your thumb on the dial to change it. That's going to be a little bit more difficult when it's in a housing. So, to change it to where you activate the button and then use the dial, go into the menu system, back into the Pencil Custom Settings and scroll down until you get to F (Controls), and then F7 (Release button to use dial) and make sure you have that set to On.

With this customization when you push a button like ISO, you can independently activate it, change the dial, and then press shutter button to go back to shooting.
A More Natural Dial Direction
This next step isn't critical, it's just something that I like to do for my own personal use and how I set up the camera in the housing and that's reversing the dial direction for shutter and aperture. The reason for that is I find that when it's in the housing and then I rotate the dial up and down, it's a more intuitive thought process to say more is up dial and down is counterclockwise, like you would an oven dial.
In order to do that, go again back into the menu system, and you're go to the Pencil Custom Settings Menu again, go to F (controls) and F6 (reverse dial rotation). I have it set to shutter speed and aperture.

For more intuitive operation underwater, utilize the reverse dial rotation customization.
The Most Important Settings All in One Place
The last trick that I have is customizing the i Menu, this is something that I found quite enjoyable with the Z6 Mark I. I can customize that i Menu for both Video and Still, so now when I toggle back and forth between those two, I have a custom set of quick settings that automatically switch.
Go into the menu system again, and go to the Pencil Custom Settings, and you can set up the i Menu for both still and video. In order to do still, go to F (controls) and then F1 (customize the i menu).
Now, this is going to be very suited to your specific desires that you want in this menu system depending on what you're trying to accomplish and how you like to change your settings.

This is where you can really set your quick settings and be faster underwater, letting you focus on composition and not be in the menu system for half your dive.
If we back out and we go to G in the same pencil icon and then go to G1, (customize the i menu for video).

So that's the quick and dirty section of setting up your Nikon Z6 III to be used in the housing. Those were my must-haves for this particular two days of shooting.
If you have any of your own specific custom settings, I'd love to hear about them or, if you have any questions about shooting the Nikon Z6 III in general feel free to shoot us an email to ikelite@ikelite.com
Additional Viewing
Nikon Z6 III Setting it Up // Ikelite 200DL Underwater Housing Assembly [VIDEO]
Nikon 24-120mm Zoom Gear Installation // Ikelite 200DL Underwater Housing [VIDEO]
Nikon Z 14-30mm f/4 S Lens for Underwater Photography Review & Results
Nikon 8-15mm Fisheye Compact 8 inch Dome Underwater Photos
DL1 DS Link Nikon TTL Converter Underwater Photos
 John Brigham is the Vice President & head of product development at Ikelite. He was born with a flair for design and an entrepreneurial spirit as son of Ikelite founder Ike Brigham. He worked his way up in the business and is a natural fit in the R&D side of things. John dives the equipment as much as possible to test product and put himself in the "fins" of the user. You may also find him on the other end of an email or phone call when you reach out for product advice and support. When he's not underwater he's flying drones, setting off rockets, training his German Shepherd "T2", and spending time with his family.
![Nikon Z6 III Setting it Up // Ikelite 200DL Underwater Housing Assembly [VIDEO]](http://www.ikelite.com/cdn/shop/articles/Nikon_Z6_III_Assembly_copy.jpg?v=1723044985&width=2000)
![Canon R5 II Re-Assigning MODE Function for Use in 200DL Underwater Housing [VIDEO]](http://www.ikelite.com/cdn/shop/articles/Reassigning_Mode_Function_Canon_R5_II_copy.jpg?v=1724252943&width=2000)