By Steve Miller
Split shots – where your dome port is half-in, half-out of the water - can be challenging to capture. For one, everything is moving. The water, your camera, the subject, and your whole body gets tossed in the swell. This results in lots of misses. But before you start deleting files, make sure you have explored the possibilities of recovering them in the editing room.
Balancing Over- and Under-Exposure
A photographer shooting split shots for the first time recently reached out with the question: "I managed to over expose and under expose the same frame! How is that even possible?"
It's not just possible, it's probable. The tonal range of a 50/50 image can be many, many f/stops. Maybe even more than your camera sensor is capable of recording, though probably not. Mirrorless cameras sold today have an incredible dynamic range.
There are techniques for minimizing tonal range, for example keeping the sun at your back. But often with big animals we have to take what we get.

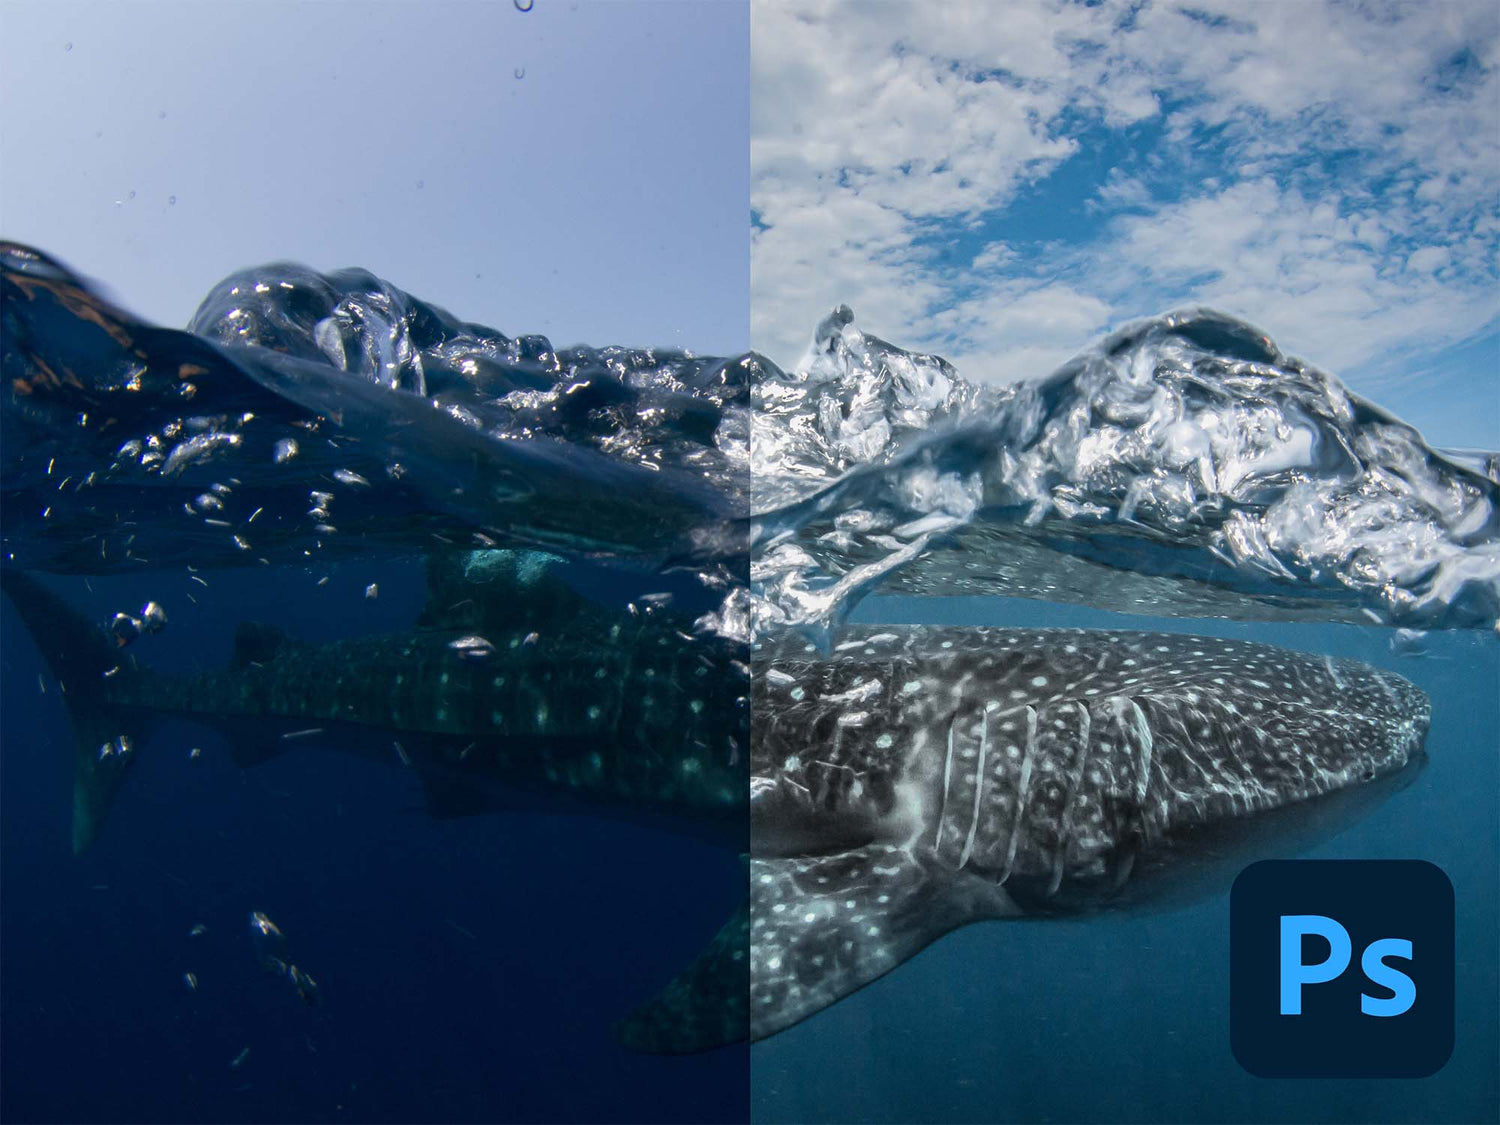
At first glance, this image is a wreck (actually, a shark haha). The only saving grace is that the highlights are not blown out. It becomes a dynamic capture after editing exposure and adding a crop in Lightroom. Check out the video to see how. © Steve Miller
Exposure Adjustments in Lightroom
Use linear gradient masks in Adobe Lightroom to handle the portions of the image above the water separately from the portions below the waterline. The gradient mask tool has markers that allow you to control exactly how gradual or abrupt you want the edge line to be. And that will be dependent on how clean the capture of the waterline was.

This whale shark image was brought back from the darkness with Lightroom. But it was shot on a cloudless day so it still lacks any interest in the upper portion of the image. © Steve Miller
Photoshop AI to the Rescue?
Photoshop has always had the ability to merge two images into a composite, and the results are often nice… as long as you don't look too close for the merge. But the process is pretty advanced for some of us.

This is the same image as before run through Photoshop’s Sky Replacement tool. Adding clouds balances out the image and directs the viewer’s attention to the whale shark. © Steve Miller
Conclusion
Next time you’re in a challenging environment, try focusing on getting the best “under” possible for your split shot. Then dry off and shoot some sunsets at happy hour with an eye towards blending later.
Additional Viewing
Tips for Shooting Split Shots with Your Underwater Housing [VIDEO]
How to Shoot Split Shots (Half-In, Half-Out of the Water)
Over-Under (Split Shots) Underwater Camera Settings
Dealing with Droplets when Shooting Split Shots
Whale Shark Photography Underwater Camera Settings
Whale Sharks Off Isla Mujeres with Ken & Kimber Kiefer
Shark Over Under Photography Camera Settings and Technique
 Ambassador Steve Miller has been a passionate teacher of underwater photography since 1980. In addition to creating aspirational photos as an ambassador, he leads the Ikelite Photo School, conducts equipment testing, contributes content and photography, represents us at dive shows and events, provides one-on-one photo advice to customers, and participates in product research and development. Steve also works as a Guest Experience Manager for the Wakatobi Dive Resort in Indonesia. In his "free" time he busies himself tweaking his very own Backyard Underwater Photo Studio which he's built for testing equipment and techniques. Read more...





![Photographing Dolphins on a Sardine Run with Jacques de Vos [VIDEO]](http://www.ikelite.com/cdn/shop/articles/shooting_dolphins.jpg?v=1720098148&width=2880)